What you waitin' for?

What you waitin' for?

Create your slideshow now!

A Super Lightweight Slider

A Super Lightweight Slider

100% WordPress and Bootstrap

Visualize Your Ideas.

Visualize Your Ideas.

And customize everything.

Green Leaves and Jam, a Plant-Based Diet

Supporting you and your plant-based diet

Flippity Flip Flop Flip, Dinner Flop.

One of the major problems with experimentation in cooking is sometimes there are flops. Sometimes there are flops and sometimes your kids know they are flops. And sometimes your kids stick their finger in your big flop of a dinner to let you know they know it was a FLOP.

GreenLeavesAndJam.com

Thanks kid. I couldn’t tell already..

Tonight I made a vegan cheese that looked really good from the picture from the original blog. I hate it when things look awesome and then they end up having the texture of snot. Yes, I said snot. I almost couldn’t even eat it. Sydney kept asking me “Is this cheese?” and then when I answered in the affirmative (why do we try to fool our kids? They can read right through us) she would then say “Mmm, yummy…” in an  “I’m trying to convince myself to like this” kind of tone. Don’t bother. Mommy didn’t like the snot either.

GreenLeavesAndJam.com Hopefully tomorrow’s dinner will turn out better.

Kristin

Posted in Plant-based Life and Parenting Tagged plant-based life and parenting Leave a comment

Cheezy Broccoli Casserole

GreenLeavesAndJam.com

I am so excited to have my husband on board with GreenLeavesAndJam. He has been talking about this for a little while so I’m glad he finally just went for it. It will be great having his perspective on things and his different pieces of advice.

IMG_0155

PLUS he is much more organized than I am so I think this will be a great addition to the website. Just ask my family. He has really taught me what organized and minimalistic truly means. When I was a teen you could never see the floor of my bedroom because it was so dirty. I had a queen size bed and yet I slept on probably a 1 foot space because the rest of the bed was covered in junk. Juxtapose that with my husbands room which was perfectly neat and his bed was always made. We started dating the second half of our senior year in high school. His clean room made such an impression on me that I still have an image of his perfectly lined up 5 pairs of shoes on his shoe rack and his 3 or 4 things lined up on the top of his dresser. That was pretty much all that was “out” in his room.

GreenLeavesAndJam.com

Enough of memory lane for now. Long story short, I love my husband and being married to him has been the best 4.5 years of my life! He really does bring out the best in me. I’m glad to have him join me here on the blog.:)

Cheezy Broccoli Casserole. GreenLeavesAndJam.com

This is a slightly different take on the Green Chile Mac and Cheese that I posted a while ago. It is therefore also an adaptation of Dreena Burton’s Mac-Oh-Geez.

Cheezy Broccoli Casserole. GreenLeavesAndJam.com

Cheezy Broccoli Casserole
 
Print
Prep time
20 mins
Cook time
22 mins
Total time
42 mins
 
Author: GreenLeavesAndJam.com
Ingredients
  • 13.25 oz box whole wheat noodles (I used penne), cooked
  • 1 lb broccoli florets, cooked
For the Sauce:
  • ¾ cup cashews
  • ½ cup almonds
  • 3 tbsp fresh lemon juice
  • 1 clove garlic, minced
  • 2 tsp cornstarch
  • 1 tsp sea salt
  • ¾ tsp onion powder
  • ¼ heaping tsp mustard powder
  • 1¾ cup soy milk, unsweetened
  • 1 tbsp white vinegar
  • 1½ cup water
  • 1½ tsp olive oil
Breadcrumb Topping
  • 1 cup panko bread crumbs
  • 1 tbsp olive oil
  • 1 tsp sea salt
  • 1 tsp paprika
Directions
  1. Cook your wheat noodles and broccoli and set aside.
  2. Preheat oven to 350 degrees.
  3. In a blender place your cashews, almonds, lemon juice, garlic, cornstarch, sea salt, onion powder, mustard powder, soy milk and vinegar and blend until smooth.
  4. Add in your water and olive oil to the blender and blend to combine.
  5. In a separate bowl mix the bread crumbs, olive oil, salt and paprika until thoroughly mixed in.
  6. To assemble pour your noodles, the sauce and the broccoli into a glass 9X13 pan and stir until evenly mixed. Sprinkle the breadcrumb mixture on top.
  7. Cover with tin foil and bake in your oven for 15 minutes.
  8. Remove tin foil and bake for another 7 minutes.
3.2.2929

Yes, this is how much my little family ate in one sitting. I can’t wait for lunch today, we will be having Cheezy Broccoli casserole leftovers.

Cheezy Broccoli Casserole. GreenLeavesAndJam.com Pair this Cheezy Broccoli Casserole with some steamed green beans, baked asparagus or the Whole Wheat Cheesecake Factory Bread and you’re good to go!

Enjoy!

Kristin

Posted in Dinner, Plant-based Life and Parenting, Recipes, Uncategorized Tagged casserole, main dish, plant based, plant-based life and parenting, vegan, vegan recipes, vegetables Leave a comment

A Husband’s perspective on a Vegan / Plant-based lifestyle

Hello everyone!

My name is Joel and I’m Kristin’s husband. I thought I’d join onto her blog as a contributing author. I’m not much of a cook so I probably won’t post any recipes unless I am really ambitious and give one a shot. I leave the cooking up to my wife. I wanted to give my 2 cents on a vegan / plant based lifestyle from a man’s perspective.

Picture1

Before we were married, I lived on a diet of cereal (for almost every meal) and an array of other processed foods. I rarely ate fruits or vegetables and didn’t even think about having a healthy lifestyle. I’ve always had pretty good self control when it comes to food so I’ve never been super overweight, but obviously I’ve never been super “healthy” either. After I got married to Kristin, I gained 20-30 lbs. eating all of her delicious cheesy, creamy, and meat filled meals. We ate amazing desserts almost every night too! Life was good.. or so I thought.

We started watching food documentaries like food matters, forks over knives, fat sick and nearly dead, and hungry for change. We immediately felt not only guilt for how bad our eating habits were, but motivation to do better. We realized that our long term health was more important than our temporary cravings. We put together a plan that consisted of the following:

  • Dump all of our meat, cheese, and other dairy products as well as any bad junk/processed food
  • When we shop, we only buy produce, beans, nuts, pastas, etc.
  • Eat salads a few times a week
  • Eat less dessert
  • Allow ourselves to splurge once or twice on the weekend so we could make this a lifestyle change

IMG_6519

Since then, I lost about 30 lbs. That was about 2 years ago now and we’ve kept it up ever since. I’ve been a little worse lately since my new company gives us lots of free food and I evidently don’t have the greatest self control especially when it comes to free unhealthy food. Kristin and I have been consistent in eating way more salad, fruits, veggies, nuts, beans, etc and it has been great. I don’t miss the meat or dairy at all. I love the food that Kristin makes and I know that if I ever get a craving for non-vegan food, I can splurge a little on the weekend. With time, I hope to get more and more health / disciplined, but for now I will keep plugging away and try to make healthy choices (if I only I could do better at work).

I hope to post on here every once in a while and I’m happy to answer any questions you might have about my perspective to eating a healthier plant-based / vegan lifestyle, especially if there is anyone out there having a hard time convincing their husband to try it out.

Until next time,

Joel


Posted in Plant-based Life and Parenting Tagged plant based, plant-based life and parenting, vegan Leave a comment

New Family Addition

On December 11th, our sweet baby boy was born! Time is flying by faster than I can keep up and he is already 2 1/2 months old! I figured it was about time to post some pictures of him finally. I was lucky enough to have a friend who is very talented with photography and does some amazing things with a camera took some beautiful photos of our little guy. If you’re curious about her work you can check out her website: http://www.ksperryphotography.com/.

I realize this is pretty much a photo dump, but I have 3 children who are starved for attention right this second so it was either a photo dump or nothing at all, so here it is.lol

IMG_9832 IMG_9885 IMG_9922 GreenLeavesAndJam.com GreenLeavesAndJam.com GreenLeavesAndJam.com GreenLeavesAndJam.com GreenLeavesAndJam.com GreenLeavesAndJam.com GreenLeavesAndJam.com GreenLeavesAndJam.com GreenLeavesAndJam.com GreenLeavesAndJam.com GreenLeavesAndJam.com GreenLeavesAndJam.com

Posted in Uncategorized Tagged plant-based life and parenting Leave a comment

Children’s Felt Christmas Tree

I wanted to share one of my favorite projects from this holiday season with you all. Maybe it will inspire you to either get crafty, or continue with the fun craftiness this season!

Children's Felt Christmas Tree. GreenLeavesAndJam.com

I feel like Christmas time is my busiest sewing season! I have made so many things the last month or so. This Christmas tree was a special treat for me to make. I was so excited to finally put this together. I saw the idea on Pinterest and wanted to make one last year, I just never got around to it. My kiddos love to play with it too which makes it that much more special. I love that I now have this fun Christmas “decoration” that my kids can pull out and play with every year.  My little one year old (can you believe he turned one a little over a week ago!!?) loves to swipe the tree clean while I try to put them up as fast as I can. It’s been fun watching my kids play with this tree. I used felt and embroidery thread to make the ornaments and presents. For the garland I just cut out a bunch of circles and used my sewing machine, feeding a different circle in as it went. The garland doesn’t stay on the tree very well though so once it comes down this year to put it away I will be permanently sewing it onto the tree.

Children's Felt Christmas Tree. GreenLeavesAndJam.com

I cut out my tree with pinking shears and then sewed around it with my sewing machine to hopefully stop any stretching out that might have happened over years of use.

Children's Felt Christmas Tree. GreenLeavesAndJam.com

For ornament ideas I went onto Pinterest and just looked up felt ornaments and found a bunch of examples and ideas for ornaments. I decided to do some random fun ones to go along with the little bulbs, but plenty of people have just done bulbs and I think that looks great as well.
Children's Felt Christmas Tree. GreenLeavesAndJam.com

Happy, healthy, (and crafty 😉 ) holidays!

Posted in Christmas, Holidays Tagged Holidays, plant-based life and parenting Leave a comment

Christmas Advent Calendar

Christmas Advent Calendar. GreenLeavesAndJam.com

Oh ouch. I had just finished typing up this entire post.. and somehow it didn’t save and I lost it. Sad day! Hopefully I can type it all up again and not miss anything! Let me know if anything doesn’t make sense.

I am so excited that I finally have an advent calendar for my family! My kids are getting old enough where we can really start establishing the traditions we want to have in our home. I saw lots of cute advent calendars online but I found one in particular that I liked and re-made it with my own little twist to it. Here is the link for the original though in case you just want to buy yourself one: https://www.etsy.com/listing/163092493/christmas-advent-calendar-scandinavian?ref=shop_home_active

My advent calendar has a scripture for each day, 1 chocolate per person per day, and a task/activity per day. I chose to type them up and laminate them. I laminated the pieces by using this contact paper. I just bought it from Walmart. I cut out my little activities and scriptures,  then cut the contact paper to size (2 sheets), peeled back the backing on the contact paper and placed the scriptures and tasks onto it. I then peeled back the second sheet of contact paper and placed it on top. I used my iron on the lowest setting possible and ironed the sheet between two pieces of fabric (so the contact paper wouldn’t melt to my iron). I cut out the pieces, and voila! They’re laminated.

Christmas Advent Calendar. GreenLeavesAndJam.com Because I am LDS I decided to use a list of scriptures that included scriptures from both the Book of Mormon and the Bible. I will include a link for a list that is only Bible scriptures as well if you would prefer one of those. I liked the mix of Bible and Book of Mormon for my family because I knew that we would be reading the story of the birth of Christ from Luke on Christmas Eve and I liked that this would be just a little different. I chose to re-type (or rather my awesome husband went onto LDS.org and looked up the scriptures and just copied and pasted them into a file and formatted them for me) the scriptures because I wanted them to fit nicely into my little squares and I also wanted to choose the font. The links I am sharing for both the Bible only version and the BOM + Bible version have the scriptures already written out and ready to just be printed if you would prefer that though.

LDS list of advent scriptures: http://www.thethingsilovemost.com/2011/11/our-other-traditions.html

Bible list of advent scriptures: http://justagirlandherblog.com/diy-advent-calendar-free-printables/

Christmas Advent Calendar. GreenLeavesAndJam.com

For the activities, I just came up with a list that I felt would suit my family. I wanted things that would bring my family closer to Christ through service, family time and through studying scriptures. I’ll include my list so that maybe it can give you some ideas to start with to create one that suits your family. I did copies of a few of them just because.

  • Go out of your way to serve someone today
  • Go out of your way to serve someone today
  • Go out of your way to serve someone today
  • Be extra forgiving today
  • Be extra nice to Sydney today
  • Be extra nice to Rome today
  • Be extra nice to Mom today
  • Be extra nice to Dad today
  • Play a game as a family today
  • Make a treat to bring to a neighbor today
  • Tell each family member why you love them
  • Call a grandparent today and ask them for a favorite Christmas memory
  • Perform an act of service for a sibling today
  • Say your prayers only giving thanks today
  • Pray out loud and have a more meaningful prayer today
  • Study scriptures for 10 extra minutes today
  • Study a Christlike attribute today using scriptures and/or conference talks: Faith, hope, charity and love, virtue, knowledge, patience, humility, diligence, obedience
  • Perform an act of service for a sibling today
  • Write a letter to a missionary today
  • Write down what you are thankful for
  • Fully Set the table and have a special meal today as a family
  • Write a note (or e-mail) to grandparents and tell them why they are special
  • Leave a note and money on a vending machine / redbox / some other kiosk for someone special to use
  • Take in your neighbor’s trashcans
  • Shovel snow from your neighbor’s driveway or rake the neighbor’s yard


Happy Holidays to all!

P.s. tomorrow I will be posting the felt Christmas tree that I made for my kids, so check back for that one!

Posted in Christmas, Holidays, Misc, Plant-based Life and Parenting Tagged Holidays, plant-based life and parenting Leave a comment

Installing (and Making) a Floating Mantle for our Stone Fireplace

Installing (and making) a Floating Mantle for our Stone Fireplace. GreenLeavesAndJam.com

Ok, I know this has nothing to do with plant-based eating, but I just had to post this fun tutorial. When my husband and I started researching how to attach a wood mantle onto a stone fireplace we had a hard time finding a tutorial that would work for us (considering the lack of tools we own and such), and therefore I decided right then and there that I needed to type up whatever we ended up pulling together. No, we aren’t pros, we are just your average joe couple who are trying to fix up our house on a tight budget.. but this worked great for us, and maybe it will for you too!

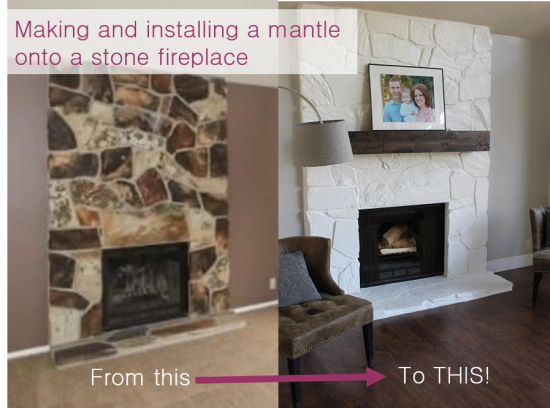
I have wanted a mantle to hang our stockings on ever since we got married. I was so excited when we moved into this house because I finally had a fireplace! Only problem was that it didn’t have a mantle! So lame! Seriously?! So that immediately went on my house wish list and we put it in the house reno budget for it to get done before Christmas came. Well, we finally got to doing it this last weekend and I am SOOO happy with the result! It turned out exactly like I was imagining!

Installing (and making) a Floating Mantle for our Stone Fireplace. GreenLeavesAndJam.com

We have done so many fun things to this house and it has really transformed over the last few months. Our kitchen/family room area is almost done, we just need a few more finishing touches (such as a few light fixtures, drawer handles, a glass door on one of our cabinets, etc..) and then I’ll post the pictures of the whole thing. But just to give you an idea of what the front room and the fireplace in particular looked like before, here is a fun picture.

Installing (and making) a Floating Mantle for our Stone Fireplace. GreenLeavesAndJam.com 
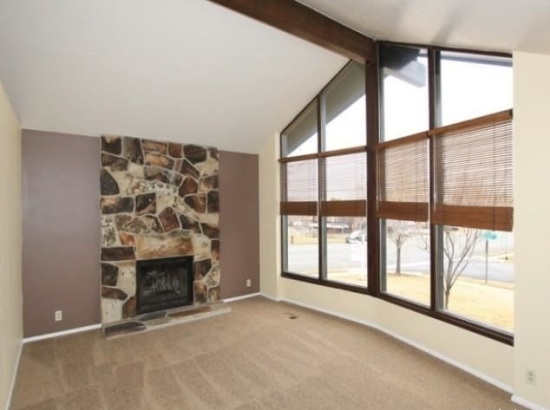
One of the first things we did after moving in was painting this fireplace. I was sooo torn on what to do with the fireplace. I was nervous to paint it because I knew that once you do that you can’t really go back. I was worried that when we go to sell our house that that might deter people, but then I finally came to the realization that anywone who would like the style and what we had done to the house would probably like the painted fireplace more than that brown/orange stone. So we went for it! Man, that made SUCH a difference in that room!

Installing (and making) a Floating Mantle for our Stone Fireplace. GreenLeavesAndJam.com

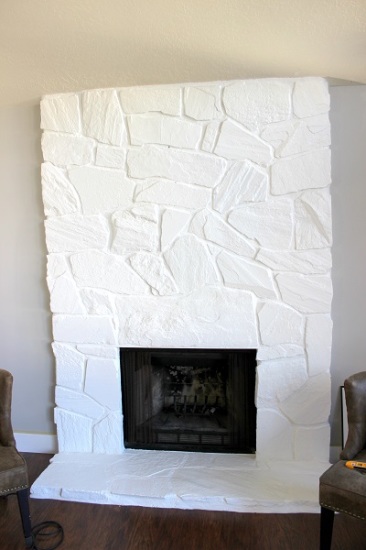
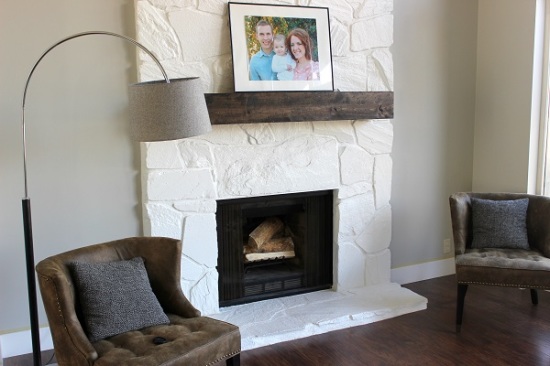
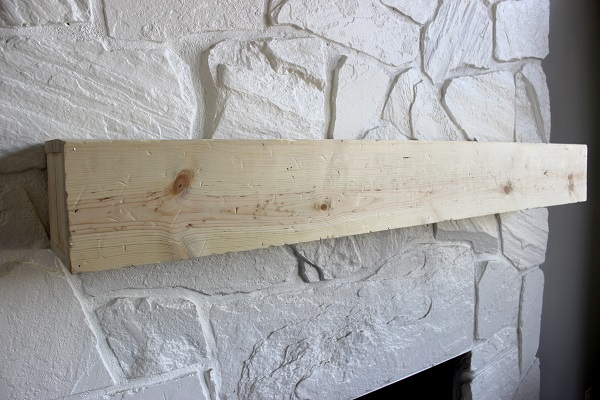
It looked fabulous, however it was obviously missing something – a mantle! So here are our pictures and the breakdown of what we did to make and install our mantle. We used the tutorial on Addicted2Decorating.com for a lot of it (like making the actual box for the mantle mainly), but we did some things differently. Here is the link for her tutorial. http://www.addicted2decorating.com/diy-rough-hewn-wood-fireplace-mantel.html. We also don’t own all the tools that she does so it cost just a little bit more. We used finishing nails and a hammer to make the box, we also rented a hammer drill and the drill bit (for $20) from Home Depot to drill into the mortar on  our fireplace. When going to buy your materials here is something to consider: Make sure the wood isn’t bowed..lol ours was a little bit so after making the mantle box we did some extra sanding to fix the bowing.

Our mantle is 5′ x 8″ x 8″. It cost us about $55, including tool rental.

Here is our material list:

one – 2×4 – 4.5 feet long

three – 2×4 – 5 inches long

three – 1×8 – 5 feet long

wood glue

long finishing nails

hammer or nail gun

hammer drill (we rented one for our project)
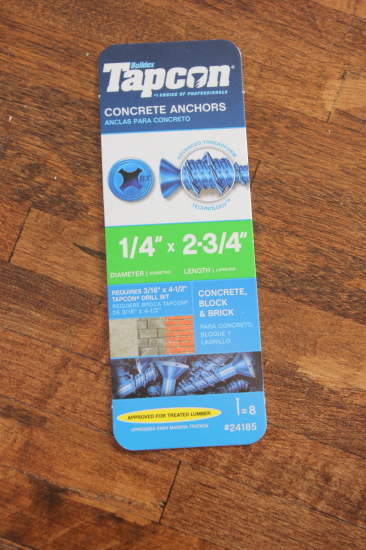
8 masonry screws

wood stain (we used Minwax Jacobean)


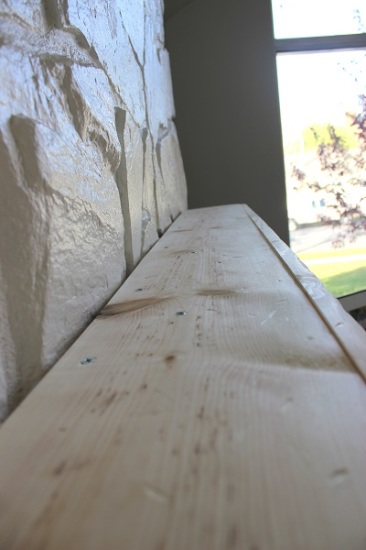
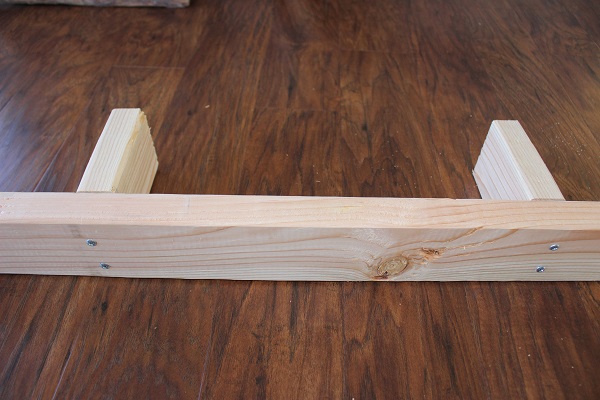
We had home depot cut all the wood for us since we don’t own a table saw yet. The first thing we did was to make and attach our 2×4 stabilizing piece to the wall. We only had 4 hours to have the tool so we were anxious to get that part completed and return the tool. We first held up the 4.5 foot long 2×4 against the fireplace and drew a line with a pencil of where we wanted it to go. It’s important to remember that the top of the mantle will be resting on top of your 2×4 and will be hanging down about another 5 inches. Don’t forget to use a leveler and get it nice and level. Next I marked on my 2×4 the places we were going to be drilling into the mortar. I wanted to make sure that our little 5′ support pieces weren’t going to be in the way of where we wanted to drill it into the fireplace. Then we pre-drilled the holed for the screws to attach our 5″ support pieces and screwed in the screws (from the back of the 2×4’s). This is what it looked like when we were done
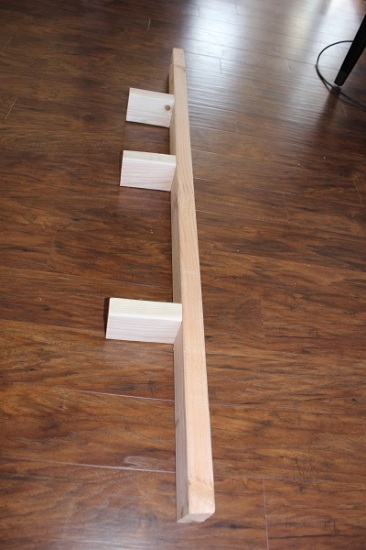
Installing (and making) a Floating Mantle for our Stone Fireplace. GreenLeavesAndJam.com

And from the back:

Installing (and making) a Floating Mantle for our Stone Fireplace. GreenLeavesAndJam.com

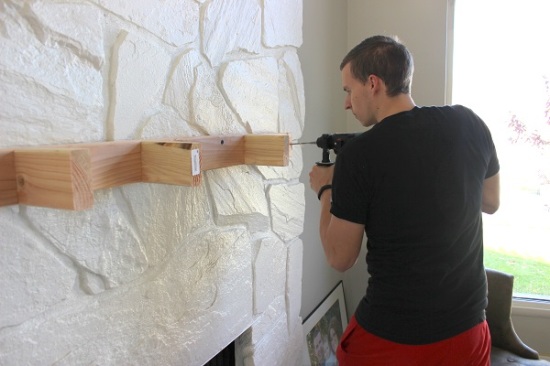
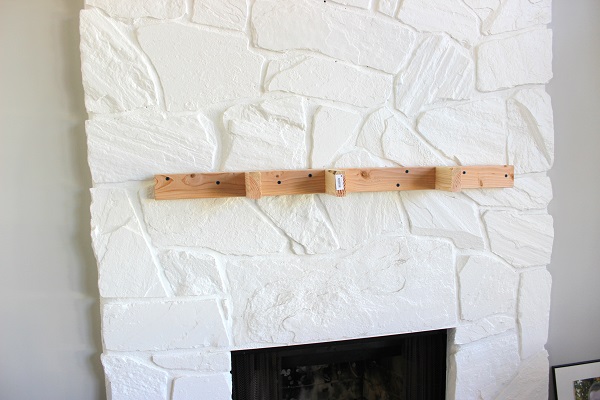
It was then time to attach it to the fireplace. We had rented a hammer drill and the drill bit from home depot. This was $50 up front, but then they returned $27 back onto our card when we returned it. Since we had already marked the top of where the 2×4 was going as well as the sides we just hung it back up there. We had also pre-marked the places we wanted to drill it in at (in 8 places.. we had 8 screws so we figured why not use them all), so it was pretty easy. I held it up while my hubby drilled and then screwed in all the screws.

Installing (and making) a Floating Mantle for our Stone Fireplace. GreenLeavesAndJam.com

Installing (and making) a Floating Mantle for our Stone Fireplace. GreenLeavesAndJam.com

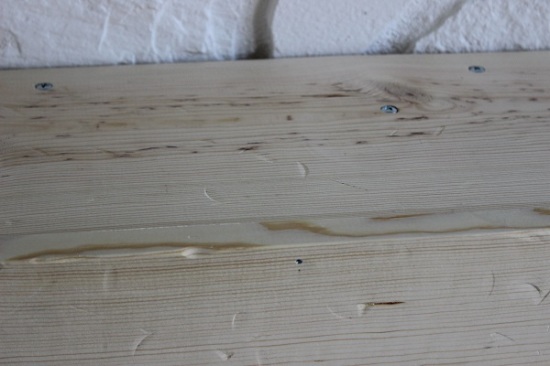
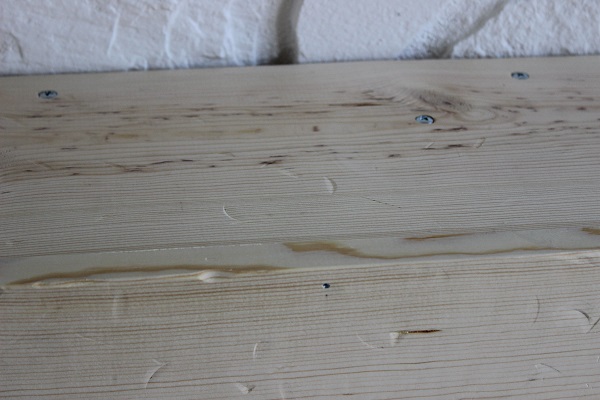
Here is a picture of the screws we used. They worked fine, I think that if we were to ever do it again we would get longer screws though. We forgot to account for the gap between the wood and the mortar that the uneven stone created, so although it went into the mortar just fine, I think for extra security I would get longer screws next time. Another thing to consider is where your flew is. Because our screws weren’t too super long and the placement of our flew was pretty far back I wasn’t worried about ours. Just remember to keep that in mind when you’re doing yours.

Installing (and making) a Floating Mantle for our Stone Fireplace. GreenLeavesAndJam.com

We returned the hammer drill and then got to work on creating our box. Like I mentioned before, we used the tutorial from Addicted2decorating.com to make the mantle box. I even did the beating up of the wood to add some character (which I love by the way!). I used a wrench, sledge hammer and a normal hammer to do that. We used liquid nails to glue our box together and then just used finishing nails to hold it all together. We didn’t have the clamps (and they’re pretty expensive and we  were trying to stay within our budget we had previously set). I actually like the finishing nails in the mantle. You can’t really see them, but when you do, I personally think it adds to the rustic character of it all. In this next picture you can see the “hammered” look I did with the tools:

Installing (and making) a Floating Mantle for our Stone Fireplace. GreenLeavesAndJam.com

Next, I held it up there while my husband screw it in in various places. We screwed it in(after pre-drilling so as to not split the wood) in the back where the 4.5 foot 2×4 was running along the inside, and then pre-drilled and screwed the screws in in the places where the 5 inch 2×4 supports were located ( I used a pencil and marked where they were on our stone fireplace and then eyeballed their location according to those marks and we pre-drilled and screwed the screws into place.

Installing (and making) a Floating Mantle for our Stone Fireplace. GreenLeavesAndJam.com

Installing (and making) a Floating Mantle for our Stone Fireplace. GreenLeavesAndJam.com

Installing (and making) a Floating Mantle for our Stone Fireplace. GreenLeavesAndJam.com

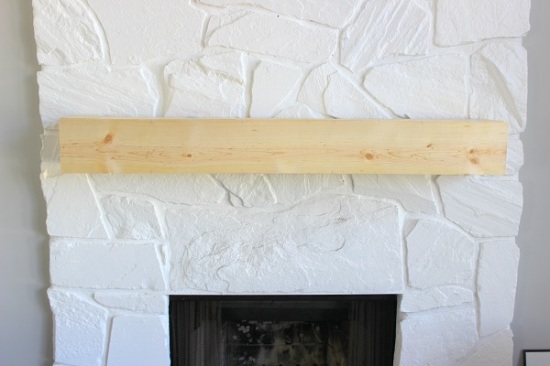
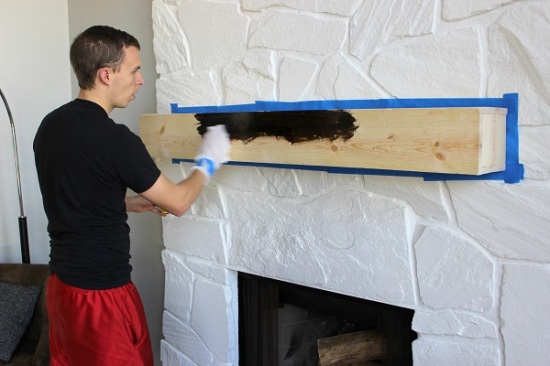
That’s it for assembly! The last thing we had to do was tape along the fireplace and then stain our new mantle!

Installing (and making) a Floating Mantle for our Stone Fireplace. GreenLeavesAndJam.com

Installing (and making) a Floating Mantle for our Stone Fireplace. GreenLeavesAndJam.com

Installing (and making) a Floating Mantle for our Stone Fireplace. GreenLeavesAndJam.com

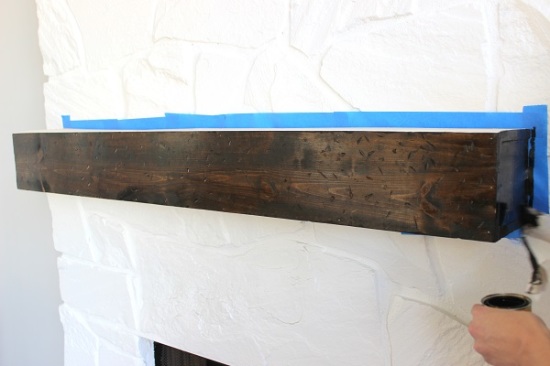
This is one of those project that we were DREADING because until we did it, we weren’t quite sure how we were going to do it. Now, after finishing it both my husband and I are so glad we did it AND we both feel it wasn’t that bad! I’m extremely happy with the result and I CAN NOT WAIT to hang our stockings!

Posted in How to's, Plant-based Life and Parenting Tagged Home Reno DIY's, plant-based life and parenting 1 Comment

Plant-based NO Chicken Noodle Soup

Plant-based NO Chicken Noodle Soup

About 15 minutes ago it was hailing outside here. I even raked my leaves earlier today. Fall is officially here. I don’t know about you but I am excited! There are so many fun things to look forward to when fall sets in. I love the holiday season and all the great traditions that come with it.

My daughter and I made caramel apples for my first time ever a few days ago. We had the best time trying to get the toppings on the apples before the caramel dried.  She especially loved the sprinkles and insisted on added sprinkles to every single one of the apples. She was pretty good with that little shaker.

GreenLeavesAndJam.com

GreenLeavesAndJam.com

GreenLeavesAndJam.com

Another thing I love in fall is soup! I used to love a good home cooked chicken noodle, but since changing over to a plant-based diet I don’t think I have had chicken noodle even once. I was sooo happy when I made this recipe and not only did it turn out, it was FABULOUS! and fabulously easy too. I made it again for dinner the other day when I couldn’t think of a single thing I had everything for when my sister suggested a broth-soup and I remembered this one.

Plant-based NO Chicken Noodle Soup

Plant-based NO Chicken Noodle Soup
 
Print
Author: GreenLeavesAndJam.com
Serves: 8
Ingredients
  • 1 yellow onion, diced
  • 1 tbsp oil
  • 3 cloves garlic, minced
  • 3 medium carrots, peeled and chopped
  • 2 celery ribs, chopped
  • ⅛ tsp thyme
  • 1 tbsp parsley
  • 3 bay leaves
  • 10 cups water
  • 1 tbsp no-chicken bullion (I use better than bullion no-chicken base)
  • 10 oz dry wheat noodles
  • salt and pepper to taste
Directions
  1. Chop your onion and place in a large pot with the oil on medium-high heat. After about 3 minutes add in your carrots, then the garlic and celery. Allow that to cook for another 4 minutes until the onions are soft.
  2. Add in your seasonings (thyme, parsley and bay leaves), along with the water, bullion and wheat noodles.
  3. Bring to a boil then reduce the heat and cover with a lid slightly tilted to allow some steam to escape. Simmer the soup over low-medium heat for 30 minutes or until the noodles are plenty soft. Remove the bay leaves and serve.
3.2.1311

Happy Fall Y’all! Enjoy some plant-based no chicken noodle soup!:)

Related Posts Plugin for WordPress, Blogger...
Posted in Dinner, Plant-based Life and Parenting, Recipes, Soup, Uncategorized Tagged main dish, plant based, plant-based life and parenting, soups, vegan recipes, vegetables Leave a comment
  • « Older Entries
  • 1
  • 2
  • 3
  • …
  • 17
  • Newer Entries »

WordPress Theme Custom Community 2 developed by Macho Themes